Obsolete computers tend to provide a wealth of interesting and useful pieces. For example, every computer has a power supply. Most are of a surprisingly high quality. They supply a number of set voltages, usually with the ability to supply a surprisingly high amount of current. They use standardized connectors which can also be scavenged from old computers.
Many electronic circuits do not require heaps of current. But that is the beauty of the thing. A circuit will only pull as much current as it needs, and it is convenient to have the excess current available when it is needed. Like when trying to power ridiculously large stepper motors... but that is hopefully the subject of a future post. For now we focus on the power supply.
A computer power supply can be much more cumbersome than is desired for use on an electronics bench. By my count, there are typically somewhere around 50 individual wires sprouting out of the side. More modern versions (ATX) don't even have a power button. They will not turn on unless connected to a computer's motherboard. Conveniently, these limitations and inconveniences can be overcome.
Lets start with turning it on.
There is a 20 pin or 24 pin connector on the power supply. This is how it connects to the motherboard on a computer. One of the wires going to this connector is green. If you connect this wire to ground, the power supply turns on. When you disconnect it, it turns off.
With this knowledge, a switch can be added to turn the power supply on or off. Or, the green wire can be soldered to ground, and the power supply will turn on whenever it is plugged in.
Next, let's get rid of most of those unnecessary wires.
For my purposes, I only left a few of the 4-pin connectors in place. This gives me access to 12 volt (yellow) and 5 volt (red) power. I also left one of the 6 pin connectors in case I needed 3.3 volt (orange) power. With the power supply unplugged, I opened up the case and removed the main circuit board. I then cut off or un-soldered the unneeded wires.
In the picture below, you can see several of the ground wires (black) cut off almost flush with the circuit board. (Above the leftmost corner of the fan, next to the mounting screw.)
An important detail is that there are three feedback wires on the 20 or 24 pin connector. These are smaller diameter wires that connect to the same pins as three of the standard diameter ones. There is one for each of the three main voltages. These must remain connected to their respective supply voltage for the power supply to continue to function. You can see below where I shortened these wires so they would fit inside the case and soldered them to the appropriate supply wires. You can also see some red and orange wires that could not be cut close to the circuit board. These were left longer and the cut ends were insulated with heat-shrink.
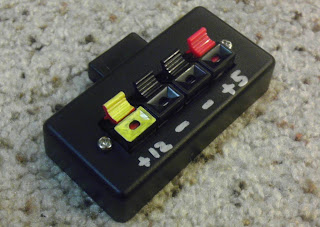
When prototyping, it is often convenient to be able to supply power to the bare end of a wire. I had the following set of connectors that I rescued from some broken speakers. When you push on the lever, you can insert the end of a wire. When you release, it is held tight. A standard 4-pin female connector was added so that it could easily be plugged in to the power supply. Below are top and bottom views.
I then attached the connectors to the top of the power supply with some double-sided foam tape.


You might note the comment written in Sharpie on the top of the power supply. When using old computer power supplies there are two weak points. One of them is the cooling fan or fans. The fans ran whenever the computer was on, and as a consequence they can be dusty, worn, and noisy. If the fan fails, there is the danger of overheating the power supply. To prevent this, I placed a drop of fresh oil on the fan bearings when I had everything disassembled. This should help preserve them and allow them to continue to cool the power supply.
The second weak point in some power supplies are the electrolytic capacitors. Due to poor manufacturing, there are many capacitors that fail before they should. Before going through all this trouble, a check should be made that the top of the capacitors in the power supply are not bulged, domed, or leaking. The top should be perfectly flat.
There are many other how-to articles on the web that discuss re-purposing a computer power supply. The power supply can be modified in a number of ways, depending on your needs. This is one good example. The author gives a brilliant tip on modifying the fans to run on lower voltages to reduce noise. This is a great idea if you don't plan on using too much current and dislike listening to the whir of a loud fan.


No comments:
Post a Comment